
I recently bought a boxed Amiga CD32 in excellent condition, and found out (a bit too late) that it wasn’t a PAL version, but a NTSC one. The CD32 was only briefly available in NTSC territory (Canada), and very few games were ever released for it. As I had already spent time and money on recapping it, as well as removed the protective plastic film from the CD32 label and CD reader window, returning it wasn’t much of an option.
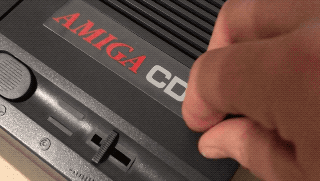
Removal of plastic film
I tried connecting a mouse to it, and through the boot menu changing the video mode to PAL, but as that (obviously) doesn’t change the components on the PCB the frequency of the video output is still 60 Hz instead of the 50 Hz required for PAL, so the image is presented in black and white instead of color. More investigations were needed.
Studying the BOM section in the CD32 service manual, there seemed to be quite a few differences between the models, and some of the components were not easy to find, especially the band pass filter (Z221) and the delay line (Z222). Luckily Krister Andersson pointed me towards Highpuffs excellent guide on replacing the CXA1145M video encoder in the A600/A1200 with a CXA2075M. The CXA2075M doesn’t need the band pass filter or delay line to function, saving me both time and money, and the CD32 is basically an Amiga 1200 with a different form factor. This was starting to look promising. Purists be damned!
As much of the video circuitry on the CD32, Amiga 600 and Amiga 1200 seem to be identical, this guide should work on them as well (with slight differences due to board layout). Please note that if you already have a PAL machine with only a broken video encoder, and/or bandpass fiter/delay line, you should follow Highpuffs guide instead.
I highly recommend having a computer nearby with access to Amiga PCB Explorer. It really helps when you’re unsure of the exact location of the component to be removed or installed. As far as I know all NTSC CD32’s are rev 3.
Be sure to read the entire post at least once before proceeding.
Parts needed
To perform this modification you’ll need the following components:
- 1 pcs 2N3904 (SOT23) or suitable replacement. In my case I went with a MMBT3904.
- 1 pcs CXA2075M (SO24).
- 1 pcs 74LS74D (SO14).
- 1 pcs 28.37516 MHz oscillator (DIL14)
- 1 pcs 4.433619 MHz crystal.
- 1 pcs 1.2 uH inductor (1206).
- 1 pcs 15 pF capacitor (1206 NPO).
- 1 pcs 22 pF capacitor (1206 NPO).
- 1 pcs 56 pF capacitor (1206 NPO).
- 1 pcs 1000 pF/1 nF capacitor (1206 X7R).
- 1 pcs 10 nF capacitor (1206 X7R).
- 1 pcs 47 nF capacitor (1206 X7R).
- 1 pcs 68 Ω resistor (1206).
- 1 pcs 180 Ω resistor (1206).
- 1 pcs 1 kΩ resistor (1206).
- 1 pcs 2.7 kΩ resistor (1206).
- 1 pcs 4.7 kΩ resistor (1206).
- 1 pcs 6.8 kΩ resistor (1206).
- 1 pcs 10 kΩ resistor (1206).
- 1 pcs 2.61 kΩ resistor (1% 0805).
- One small piece of wire.
- Optional: MDG-UD3626 RF modulator.
Parts to remove
The components that should be removed from the CD32 PCB are the following:
Top side
- Z221 (Bandpass filter)
- Z222 (Delay line)
- R203 (0 Ω 1206 resistor)
- X1 (28.63636 MHz oscillator)
- X2 (MDG-VA3424 RF modulator)
- U12 (CXA1145M video encoder)
Bottom side
- C221 and C222 (100 nF 1206 ceramic capacitors)
- R221 and R222 (1 kΩ 1206 resistors)
- R223 (866 Ω 1206 resistor)
- R224 (820 Ω 1206 resistor)
- R225 (0 Ω 1206 resistor)
- R236 (120 Ω 1206 resistor)
- R246 (2.7 Ω 1206 resistor)
Parts to install
Before proceeding you need to cut off legs 8 and 9 from the CXA2075M and pads 8 and 9 of the U12 footprint need to be bridged. You can bridge the pads before or after you solder the chip down, but I recommend that you to it before and be really careful when you solder the chip so that you don’t undo the bridge.
The parts that needs to be installed are:
Top side
- U12 (CXA2075M video encoder)
- U33 (74LS74D)
- C33 (47 nF 1206 capacitor)
- L241 (1.2 uH 1206 inductor)
- Q461 (2N3904/MMBT3904 transistor)
- Y451 (4.433619 MHz crystal)
- X1 (28.37516 MHz oscillator)
- X2 (MDG-UD3626 PAL RF modulator, optional)
Bottom side
- C241 (56 pF 1206 capacitor)
- C242 (15 pF 1206 capacitor)
- C243 (1000 pF 1206 capacitor)
- C244 (10 nF 1206 capacitor)
- E124C (22 pF 1206 capacitor)
- E124R (68 Ω 1206 resistor)
- R236 (180 Ω 1206 resistor)
- R241 (4.7 kΩ 1206 resistor)
- R242 (6.8 kΩ 1206 resistor)
- R243 (10 kΩ 1206 resistor)
- R244 (1 kΩ 1206 resistor)
- R245 (2.7 kΩ 1206 resistor)
- C222 (2.61 kΩ 1 % 1206 resistor)
- Wire from the C222 pad nearest the RF modulator to +5 V somewhere on the board. See the PDF below for a suggestion.
When all this is done your CD32 should be a true PAL CD32 instead of a NTSC model. I know mine is, and it’s glorious.
PDF cheat sheet
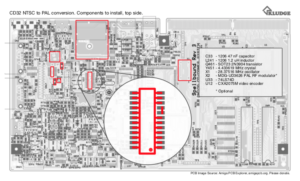
CD32 NTSC to PAL conversion (2 MB)
To help keep track of where you’re at when you do this modification I created a PDF cheat sheet. I think it’s a nice complement to Amiga PCB Explorer, especially when removing parts as you don’t really need to know what they’re called when removing them. It also shows how to modify the CXA2075M.
Final thoughts
Please note that I can’t take any responsibility for this mod or if I’ve made a typo somewhere. Proceed at your own risk. Have a blast!